- 1. LEGO Building Instructions : 레고 조립
It is a very simple and easy robot. Even beginners can easily copy and assemble. You can learn how to move a robot through various remote control methods. Through this class, you can understand different joystick interface strategies. 매우 간단하면서 쉬운 로봇이다. 초보자도 쉽게 따라하면서 조립이 가능하다. 다양한 원격제어 방법을 통해 로봇을 움직이는 방법을 배울 수 있다. 이 수업을 통해 각각 다른 조이스틱 인터페이스 전략을 이해할 수 있다.
- LEGO Block Coding : 레고 블록 코딩

It has four buttons, up/down/left/right, and when pressed, the robot moves. However, when pressed once, the defined value is applied only once. If you press continuously, the value will not be entered continuously. 위/아래/좌/우 4개의 버튼으로 되어있으며 누르면 로봇이 움직인다. 단, 한번 누르면 정의된 값 한번만 적용된다. 계속 누른다고 값이 계속 입력되지 않는다.
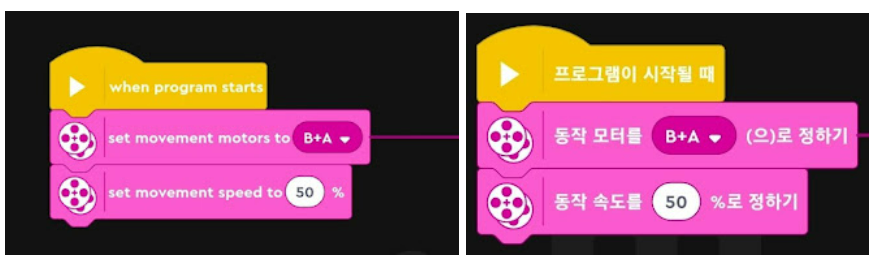
Set motor A+B at the same time and enter the speed value. If the robot goes in the opposite direction, modify it to B+A or change it to negative -50%. 모터 A+B를 동시에 설정하고 속도 값을 입력한다. 만약 로봇이 반대로 간다면 B+A 로 수정하거나 음수 -50% 로 변경한다.

Select "Forward" and press. The input value is 10 cm. The button name can be changed on the coding screen. The same goes for "Backward". "Forward" 및 누름을 선택한다. 입력 값은 10cm 이다. 버튼 이름은 코딩화면에서 변경이 가능하다. "Backward"도 동일하다.
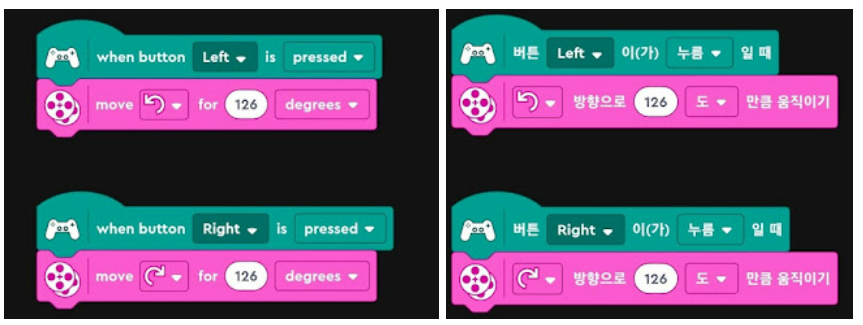
In the same way, set the left/right buttons. Note the "arrow direction icon" when entering values. However, the unit may be changed to an angle and 126 degrees or another value may be entered. If the robot makes a large change of direction, enter a small value. 동일하게, 좌/우 버튼도 설정한다. 값을 입력할때 화살표 방향을 주의하자. 단, 단위는 각도로 변경하며 126도 또는 다른 값을 입력해도 된다. 방향 전환을 크게 한다면 작은 값을 입력한다.
2. Directional Pad Remote Control : 십자패드 원격제어 (Directional Pad.lms)

It is cross-shaped and is convenient to operate with one finger because it is close to up/down/left/right. If you press continuously, the value will continue to be entered. 십자모양이며 상/히/좌/우 가 가깝게 있어 손가락 하나로 조작하기 편리하다. 계속 누르면 값이 계속 입력된다.

Set the motor A+B at the same time as Table of Contents No. 1 and enter the value. 목차 1번과 동일하게 모터 A+B를 동시에 설정하고 값을 입력한다.

Set "Up" and "Down". Then, when there is no input, select "no" and add "motor stop function block". The direction of the motor is defined as a straight line when "up". When "down", enter a negative -50% speed and add a straight-through function block to it. Again, define the 50% speed value here. This way the robot calculates in the opposite direction. "위" 및 "아래"를 설정한다. 그리고 아무 입력이 없을때 "no"를 선택하고 모터 멈춤 기능블록을 추가한다. 모터 방향은 "위" 일때 직선 방향으로 정의한다. "아래"일때는 속도를 음수 -50%를 입력하고 여기에 직선방향 기능블록을 추가한다. 다시 여기에 50% 속도 값을 정의한다. 이렇게해야 로봇이 반대방향으로 계산한다.

Left and right are the same. Look at the picture and enter the value. 왼쪽 및 오른쪽도 동일하다. 그림을 보면 값을 입력한다.
3. Direction Change Remote Control : 진행방향 바꾸기 원격제어 (Direction Change.lms)

Simultaneously controls the motor. Move the forward/back/left/right robot using the moving stick. 모터제어를 동시에 합니다. 이동 막대기를 이용하여 앞/뒤/좌/우 로봇을 움직입니다.
 |
 |
Controls motor A+B simultaneously. SV1 moves the robot forward/backward and SH1 moves left/right. The important point is that the robot must have an "Input value of SV1" to change direction. 모터 A+B를 동시에 제어 합니다. SV1은 로봇을 압/뒤로 이동하고 SH1은 좌/우로 이동합니다. 중요한점은 SV1의 입력이 있어야만 로봇이 방향전환이 가능합니다.
4. Moving Stick (Sliders) Remote Control : 수평/수직 이동 막대기 원격제어 (Moving Stick.lms)

Controls each motor. Use the slide joystick to remotely control each motor. 각 모터를 제어 합니다. 슬라이드 조이스틱을 이용해 각 모터를 원격제어 합니다.
 |
 |
SV1 is a vertical bar and a SH horizontal bar. Motor A has a speed control value of "SV1 - SH1". The input of motor B is "SV1 + SH1" multiplied by "-1". When there is no input in SV1, the robot goes straight. SV1는 수직 막대 그리고 SH 수평 막대입니다. 모터 A의 속도 제어 값은 "SV1 - SH1" 입니다. 모터 B의 입력은 "SV1 + SH1" 에 "-1"을 곱한 값 입니다. SV1 에 입력이 없을때 로봇은 직진을 합니다.
5. All Around Button Remote Control : 만능 버튼 원격제어 (All Around Button.lms)

Controls each motor. A button on the joystick allows remote control of the "easy robot" left/right/front/back simultaneously. 각 모터를 제어합니다. 조이스틱의 버튼 하나로 "쉬운 로봇"의 좌/우/앞/뒤를 동시에 원격 제어가 가능합니다.
 |
 |
Suppose that the right side of the circle is the X-axis and the top side is the Y-axis. If there is no joystick value input on the X-axis, only the Y-axis value remains and the robot moves forward. The input value of the B motor is the same, but since the A motor is installed in the opposite direction to the B motor, it multiplies the opposite direction, "-1". 원을 중심으로 오른쪽이 X축 위가 Y축이라고 가정합니다. X축의 조이스틱 값 입력이 없다면 Y축 값만 남게되고 로봇은 앞으로 이동합니다. B 모터 입력 값도 동일한데 A모터는 B 모터와 반대방향으로 설치되어 있기때문에 반대 방향인 "-1" 을 곱해줍니다.
- Robot Test : 기능 테스트
Copy me! Easy Robot 2.1. Lego Block Coding - 4 button remote control
https://youtu.be/07iIBPgspAU
Copy me! Easy Robot 2.2. Lego Block Coding - Directional pad remote control
https://youtu.be/4uK8hRV6Y0s
Copy me! Easy Robot 2.3. Lego Block Coding - Remote control of direction change
https://youtu.be/IQEmd3xGnnc
Copy me! Easy Robot 2.4. Lego Block Coding - Slider remote control
https://youtu.be/tlE03Cax0J8
Copy me! Easy Robot 2.5. Lego Block Coding - All around button remote control
https://youtu.be/aWyJy82a_bo
'LEGO Technic : 레고 공학' 카테고리의 다른 글
| Wheel Teleoperation (0) | 2023.02.14 |
|---|---|
| Play Spinning Top ! : 玩陀螺! (0) | 2023.02.12 |
| Robot Bring It Cherry! Snack! Yummy! : 로봇이 직접 주는 체리! 과자! (0) | 2023.02.01 |
| Smart Forklift : 똑똑한 지게차 (0) | 2023.01.24 |
| Review - Mindstorms Robot Inventor 51515 : 리뷰 레고 로봇 발명가 (1) | 2023.01.23 |


